So, you want to cover up your 285s or you want to squeeze your 315s off your vette on to your STI? Karlton has your solution. He got flares built to his specs and now he’s written a nice little how to for us all. I’ll leave the rest to Karlton.
I had these flares produced as I had a need for fitting wider tires for autocross. I thought about doing a widebody, but the cost of install kind of scared me away, as often times the cost of the install and paintwork is more than the cost of the widebody kit LOL. So I went for the next best thing, I had some fender  flares made for my car. Relatively simple to install, and a whole lot cheaper than the widebody route. So I basically can have a widebody to fit my tire needs without the crazy cost 🙂 So how do you install these you ask? Well let’s start with the front since it’s the easiest to do.
First thing I did was I taped the flares up to the car (I was working alone, a second set of hands could be very helpful!). This gave me a rough idea of fit etc. Now this is where I deviated from what most people would probably do. Instead of cutting/clearancing my fenders first, I decided to install the flares first, using nutserts and stainless steel button head bolts. I did this because, first of all, I couldn’t wait when I first got them I had to install them right away LOL and also because then I knew exactly where the flares would be and exactly how much the flare covered, so I knew where and how much I could cut.

So now the flare is taped on the fender, so the next step is to drill!! I started with a pretty small drill bit to make a pilot hole first. I also started with the upper hole closest to the door, then the front hole by the bumper, then finally the lower hole near the door. If you have 2 people, then you won’t have to do this next step, but I was working solo. What I did was I used small sheetmetal screws and screwed the flare into place. Then I would unscrew one, drill to the appropriate size I needed for the nutserts I used (I used a 3/8″ drill bit), and move on to the next one. After you have your holes drilled, take your nutserts and nutsert tool and go ahead and install them, and try to install them as flush with the metal as possible. Once the nutserts are installed, go ahead and install the flare with the appropriate bolts. Once this step is done, I was ready to cut my stock fender for clearance.


My next step was to use blue painters tape and mask along the top of the flare. This was so I knew NOT to cut there as it wouldn’t be covered hahaha. Now that you have the nutserts in place, that also gives you an idea of where you can cut. So go ahead and take the flare off, and prepare yourself for cutting. I used an angle grinder with a cut off wheel, and basically cut about an inch and a half below my tape line. I cut the front bumper a bit where I thought I could have a clearance issue (the top area of the bumper) and I cut all the way along the back, but I left the rear tab where the fender liner attaches. This is so I could continue to run the back half of my fender liner. I then switched to a grinding stone on my angle grinder and smoothed out my cut a bit. Then I just painted it with some rustoleum I had on the shelf. Install the flare and that’s it!


The front bumper piece is the same concept. Tape it up there, drill the holes, and bolt them on 🙂 The only difference is for the plastic pieces (i.e. the bumpers) , it’s best to just use a washer and nut on the backside of the bolts, since nutserts are not technically supposed to go into soft materials such as plastic.
Now for the rears, these are a bit more tricky but definitely doable. Basically do the same thing as the fronts. I taped them up, drilled pilot holes, screwed them in, then drilled larger holes . Took them off, installed the nutserts, bolted them back up (again using just a bolt/washer/nut for the rear bumper attachmen), Â taped along the top edge for reference, then took the flare back off.

This is where it gets a bit more difficult. What I did was I cut a radius on the outer layer of metal with my angle grinder and cut off wheel, leaving just the inner layer there in place. The problem I had was that I already cut my inner metal the first time I pulled my fenders for wider wheels/tires, so I had less inner metal to work with. What I then did was I made little vertical slits in the inner layer so that I could fold it up to contact the outer layer. This is so I could bond the inner and outer layers back together for strength, but also to save the tires in case they somehow made contact with the cut fender (highly unlikely as I cut up quite far hahaha). With the inner layer folded up, there’s no sharp edge to contact the tire.

Now originally I was going to weld the 2 layers back together, but I got scared I was going to warp the metal or something with too much heat. So I used some automotive panel adhesive (like what corvettes are glued together with) with the special gun with 2 plungers. Honestly this should work just fine, but if it happens to separate, I will grind all the glue away then weld. I also put a coat of this adhesive everywhere there was a gap to seal it all from moisture.


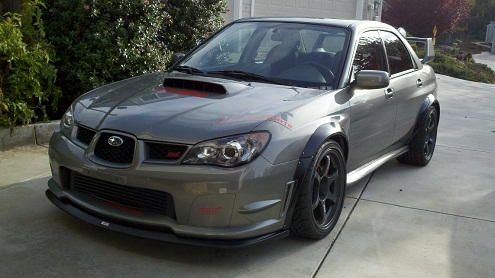
After this is done, I didnt even paint the metal as there is no exposed bare metal left. After this is done, it’s time to install the flare back on. For the forward most piece of the large rear flare, it is held on with 1 screw that goes into the metal where there is usually a rubber piece. Not sure what purpose that rubber piece holds but I removed it and screwed the flare into the flap. I had to use some washers though in between the metal flap and the flare as the company made the flares over the rubber piece, and now since my rubber piece is no longer there, there’s a bit of a gap. After you have the main fender flare piece installed, open the door and make sure it clears the flare. Then, the final step is to use some double sided tape and tape on the door piece, keeping an equal gap between it and the flare. Once that’s installed, all done!! Definitely a whole lot easier than doing a widebody kit, and now I can fit my 18×10.5 +25Â wheels with 285/30/18 tires EASILY. Tons of room for more wheel and tire 🙂


T3h_Clap commentary: 18×10.5 +25mm and 285s and they look TINY! These flares are going to be a must have for any SM or STM STi. I think these would be great on a lot of time attack STi’s too. The great thing about these flares is were designed for the STI from the start. I can’t wait to get my hands on a set that fit the 05 Front bumper for my car.
First off I want to thank Karlton for all the hard work he’s put in to get these made. He’s got the molds and is starting to make these bad boys for the 06 STi’s. If anyone is interested in a set comment/email me and I’ll get you in contact with him.
Hello! Anyone interested in the flares please e-mail me at subyflares@gmail.com . Thanks!
Karlton
I’m very interested in a set of an ’05 WRX
Looks great on that 06 i have one also so im very interested in getting the contact info for those flares
I am interested in the flares.. Can you send me some more info on the pricing. Thank you.
I am interested in the flares.. Can you send me some more info on the pricing. Thank you. Foes the car maintain use of the splash guards or are those removed as well?
i am very interested in purchasing the flares, can you have karlton contact me pls.
thanx!
ill take a set email me paypall how long till i get them
im interested in getting a set of these flares. Can you pls let me know where i can purchase a set for my 06’STI??
Interested in purchasing karlton fender flares. Please email me his contact information.
Hey I was wondering if you could please give me some info on Karlton and how to purchase these?
It is for a bugeye….but if it’s close i can modify them to fit from the bumper area.
Please let me know. I need these 17×10 CCW classics on already. 🙁
Anthony
Need these ASAP, please email info!
JSRiedel@Gmail.com
Very interested on these flares, please contact me 🙂
Hay mate, im keen on some of these for a 06 sti. How much and were can i get these from?
Thanks
I’m interested in purchasing a set of these flares, can you please get me the contact info?
pricing and availability for 02-03 wrx please.
Email me please I’m wondering of they would fit my 07 STi?
Thanks
please email contact info, very interested in buying a set!
im very interested in a set of these flares for my 05 sti. can you please send me the info so i can purchase a set
Interested in the fender flares, are they still available?
Would these work on a wagon??
Love the flares want a set for 04sti
I emailed Karlton at Subyflares a few days ago and no response. Are these still available?
Those are t*tt*es! What would it take to get some for an ’05 STI?
Cheers-
Brian
Those are awesome, interested for 04 STi.
GM, LIKE TO PURCHASE A SET OF FLARES FOR MY LIMITED EDTION STI 2007. PLEASE EMAIL THE INFO…READY TO BUY…
Can you email me prices and contact info for an 05 STI
Steve.
Love the flares want a set for 06sti,can you please get me the contact info?
greetings and thanks
where did you get the thread-serts? I can’t seem to find the same ones used. What material are they made out of. I can find the install tool as show just not the inserts
What email do send our request too? and too wjo?
Do fenders like these exist for an Evo X???
They are such a cool mod!
Thanks!
They look awesome. I deff want to buy them
Would like a set for my 04 STi, pm me for pricing and availability. Thanks.
Are these still obtainable??
maybe i should get a set and have it fitted to the 09 lancer
These flares gives people a head turn. attention catcher. I have these Fender Flares on my 07 STi, but earlier today. I went on by lunch break from work, and as I was walking towards my car I noticed that a piece of my Fender Flare is missing. I don’t know what happened to it. I don’t recall hitting anything on my way to work this morning. The holes where the screws goes are fine. I honestly don’t care what happened. I just want to install the missing piece back. Is it possible for me to purchase the only missing piece? I will gladly appreciate if you have Karlton contact me. Very nice DIY by the way!
good day! please help in acquiring Karlton fenders for STI 04, Andrew, Russia.
My friends in Russia as well as I want to buy Karlton its STI, I am looking for them for over a year for yourself! please tell me or send me nikolaev@cofekeks.ru where you can buy and how to deliver. ready to buy a few sets! thank you in advance! with respect Andrew.
Please contact me ASAP I need these flares really badly thanks.
So when are the V1’s getting made
If you could give me the info for the guy who sells these then I will purchase them on the spot. Been looking for these everywhere. I just purchased an 07 sti and thought these wouldn’t be hard to come by.
Or just send an email to patriots1fann@aol.com
I have an 06 Subaru and looking for the fenders please email me where I can get them glowz90@yahoo.com
I have 06 sti looking 4 flares email me thanks.
Where can i buy them?
Price?
shipping to austria?
Thanks for quick answer 😉
regards